
In today’s digital age, it’s important to keep our personal information secure. If you have sensitive data stored in your notes, such as financial details, medical information, or website logins, you can take steps to protect them on your iPhone or iPad. In this article, we will guide you through the process of locking or unlocking notes on your Apple device.
Before You Begin
Before you proceed with locking or unlocking your notes, make sure you meet the following requirements:
Bạn đang xem: How to Lock or Unlock Notes on Your iPhone or iPad
- Update your iPhone or iPad to the latest version of iOS or iPadOS.
- Turn on Notes in your iCloud Settings, or ensure that you use notes stored on your device. Note that notes synced from third-party services like Gmail or Yahoo may not have all the Notes features and cannot be locked.
Now that you’re ready, let’s dive into the steps!
Lock Notes with Your iPhone Passcode or a Unique Password
Starting from iOS 16, Apple offers two options to lock your notes. You can either use your iPhone passcode or create a unique password specifically for Notes. Both options provide end-to-end encryption for iCloud accounts, ensuring the security of your information.
-
To lock notes using your iPhone passcode, you don’t need to create a separate password. If you access your iCloud notes on multiple Apple devices, use the passcode or login password of each device to unlock those notes.
-
If you prefer to use a unique password for Notes, bear in mind that there is no way to access your locked notes if you forget the password. In case you forget the password, you can reset your notes password and use the new password to lock other notes. If you access your iCloud notes on several Apple devices, use the same notes password to lock and unlock all of them.
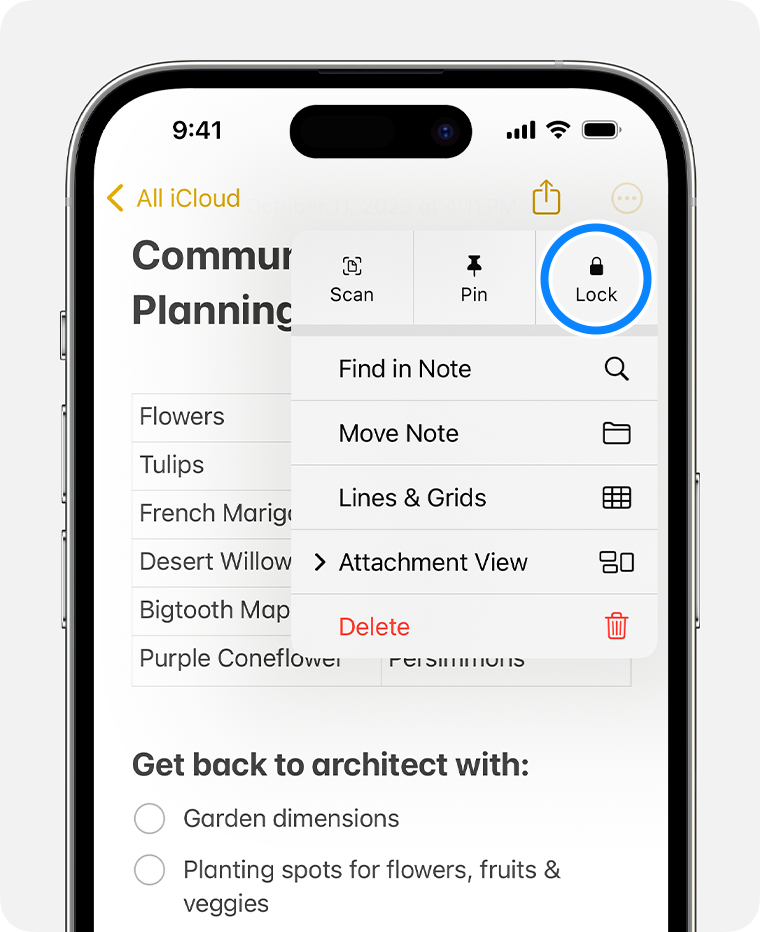
Lock a Note
Follow these steps to lock a specific note on your iPhone or iPad:
- Open the note that you want to lock.
- Tap the More button.
- Tap Lock.
Xem thêm : What is Outsourcing in Cyber Security?
After locking a note, you will see the Lock icon at the top of the screen. Tapping the Lock icon will hide the contents of the note. For further information on locking Notes on Mac, check out the official documentation.
Open a Locked Note
To access a locked note on your iPhone or iPad, follow these steps:
- Tap the locked note you wish to view.
- Tap View Note.
- Use Face ID, Touch ID, or enter your password.
Locked notes remain open for several minutes, allowing you to switch to another note, copy and paste information from other apps, and perform other tasks. If you close the Notes app or your device goes to sleep, the note will automatically lock again.
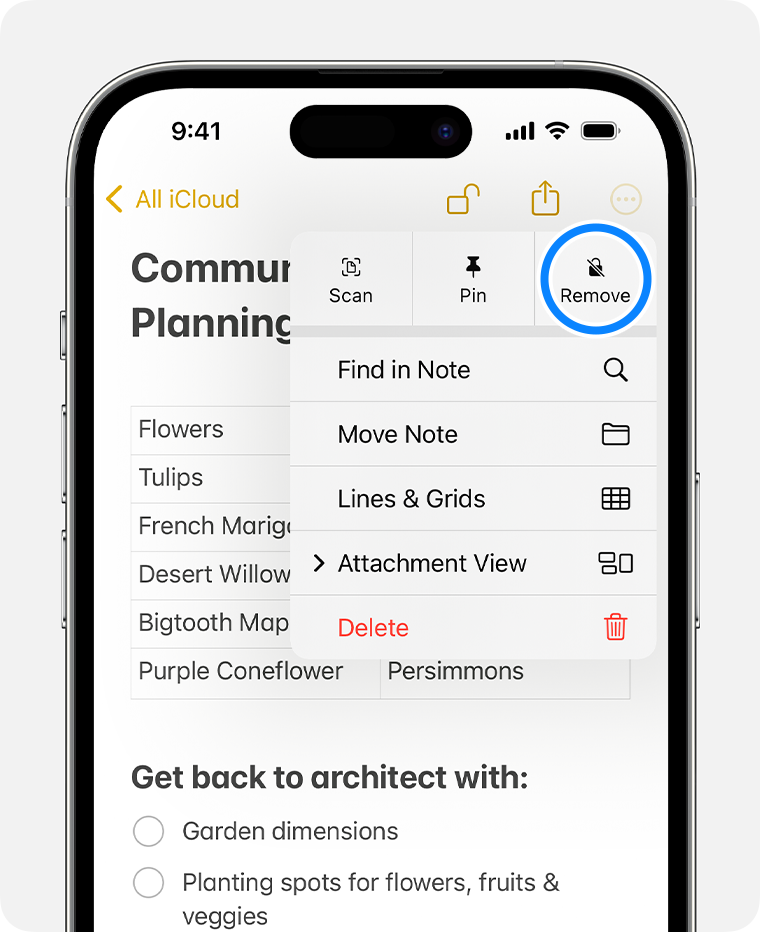
Remove a Lock
If you no longer need to keep a note locked, you can remove the lock by following these steps:
- Tap the locked note and then tap View Note.
- Enter your password, use Face ID, or utilize Touch ID.
- Tap the More button.
- Choose Remove.
By removing a lock from a note, the lock will be removed from all devices linked to the same Apple ID.
Switch from Your Notes Password to Your iPhone Passcode
To switch from using a notes password to your iPhone passcode, follow these steps:
- Ensure that iCloud Keychain is enabled. To use your device passcode for locked notes, you must have iCloud Keychain turned on.
- In the Settings app, tap Notes.
- Tap Password.
- Select Use Device Passcode.
- Use Face ID or Touch ID, or enter your previous notes password.
- Enter your iPhone passcode.
- Tap OK. All your locked notes that used your most recent notes password will now be updated to use your device passcode.
Change Your Notes Password
If you wish to change your notes password, follow these steps:
- In the Settings app, tap Notes.
- Tap Password.
- Select the Notes account that you want to change, then tap Change Password.
- Use Face ID or Touch ID, or enter your previous notes password.
- Enter a new password and password hint.
Reset Your Notes Password if You Forgot It
For situations where you forgot your notes password, follow the steps below to reset it:
- In the Settings app, tap Notes, and then tap Password.
- Select the Notes account you want to change, then tap Reset Password.
- Enter your Apple ID password, then tap OK.
- Tap Reset Password again.
- Use your device passcode or enter a new password and password hint. Tap Done.
Xem thêm : How to Reset Android Phone When Locked?
Please note that if you reset your notes password, you won’t be able to regain access to your old locked notes. However, you can protect any future notes with your new password or switch to your device passcode.
Frequently Asked Questions
Q: Can I use my iPhone passcode to lock and unlock notes?
A: Yes, you have the option to use either your iPhone passcode or create a unique password for Notes.
Q: What happens if I forget my notes password?
A: If you forget your notes password, Apple cannot help you regain access to your locked notes. However, you can create a new notes password or use your device passcode instead. Keep in mind that this won’t give you access to your old notes.
Q: Can I switch from my notes password to my iPhone passcode?
A: Yes, you can switch from using a notes password to your iPhone passcode. Just make sure iCloud Keychain is enabled and follow the steps provided earlier in this article.
Conclusion
Keeping your personal information secure is crucial in today’s digital world. By following the steps outlined in this article, you can easily lock or unlock notes on your iPhone or iPad, ensuring that your sensitive data remains protected. Remember to use either your iPhone passcode or a unique password for Notes, and always keep your passwords secure. For more information about Eireview and its services, visit the official website.
Eireview is committed to providing informative and accurate content on the latest technology trends. Stay tuned for more helpful articles!
Nguồn: https://eireview.org
Danh mục: Technology