Are you tired of being tied to your computer when you want to share your amazing photos online? Well, good news! Your Canon EOS Rebel T7/2000D camera has a Wi-Fi feature that allows you to transfer files to your smartphone or tablet. This means you can easily share your photos on social media, attach them to emails or text messages, or simply launch them into the vast world of cyberspace. Let’s dive into the process of transferring files to your smart device!
Bạn đang xem: Transferring Files from Your Canon EOS Rebel T7/2000D to a Smartphone or Tablet
Setting Up Wi-Fi Functions
Before you start enjoying the convenience of transferring files wirelessly, there are a few steps you need to follow:
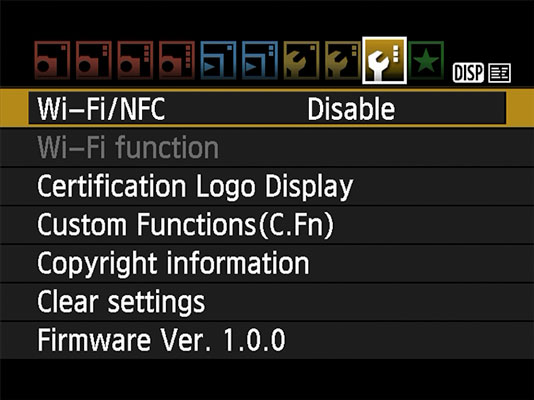
- Open the Setup Menu 3 on your camera and choose Wi-Fi/NFC.
- Press Set to select Enable on the following screen.
- Enter a nickname for your camera and press Set.
- Press the Menu button, select OK, and press Set.
- Congratulations! Your camera is now ready for Wi-Fi connections.
Transferring Images to Your Smart Device
Xem thêm : Fix Samsung TV Not Connecting To WiFi in 2024
Now that your camera is set up, you can connect it to your smartphone or tablet and transfer your photos. Here’s how:
- On your camera, open the Setup Menu 3 and choose Wi-Fi Function.
- Select the phone icon and press Set.
- Choose Easy Connection and press Set.
- The camera will display your assigned nickname and an encryption key.
- On your smart device, enable Wi-Fi and open the wireless settings screen.
- Select your camera’s name from the available networks and enter the encryption key as the password.
- Join the network on your device and open the Canon Camera Connect app.
- Tap on “Canon EOS Rebel T7” to finalize the connection.
- Press the DISP button on your camera to specify which images you want to access.
- Exit the camera screens on your smart device.
- Choose “Images on Camera” in the app and select the images you want to transfer.
- Tap the Download icon and choose the download size. Then, tap OK to transfer the images to your device.
That’s it! You have successfully transferred your images to your smart device. You can now enjoy the freedom of sharing your photos wherever you go.
Reconnecting Your Devices
Once you have connected your camera to your smart device for the first time, you don’t need to repeat all the steps. Here’s what you should do instead:
- On your camera, open Setup Menu 3 and enable the Wi-Fi/NFC option.
- Choose Wi-Fi Function and select the phone icon.
- Highlight Connect to use your previous settings.
- Select OK and press Set.
- On your smart device, select your camera from the list of available wireless networks.
- Open the Canon Camera Connect app on your smart device.
Xem thêm : The State of the Union: Daily Wire Launches Bentkey, a New Kids Entertainment Company
The two devices should connect automatically, and you can control everything through the app. You can also change settings related to image transfers on the camera’s menu accessed through the steps above.
Remember, you can set up connections with multiple devices, such as a smartphone and a tablet, running on different platforms. The downloadable Wi-Fi instruction manual provides more details on creating multiple connections and fine-tuning your Wi-Fi setup.
Now, go out and capture stunning photos with your Canon EOS Rebel T7/2000D, knowing that transferring them to your smartphone or tablet is just a few simple steps away!
Nguồn: https://eireview.org
Danh mục: Technology