
Before diving into the solutions for the F11 System Recovery not working issue with HP computers, let’s understand the background. F11 is a special key set by HP, Dell, or Lenovo to recover the system to its default settings in case of hardware or software failure.
To access the recovery partition and recovery system with HP Backup and Recovery Manager, follow these steps:
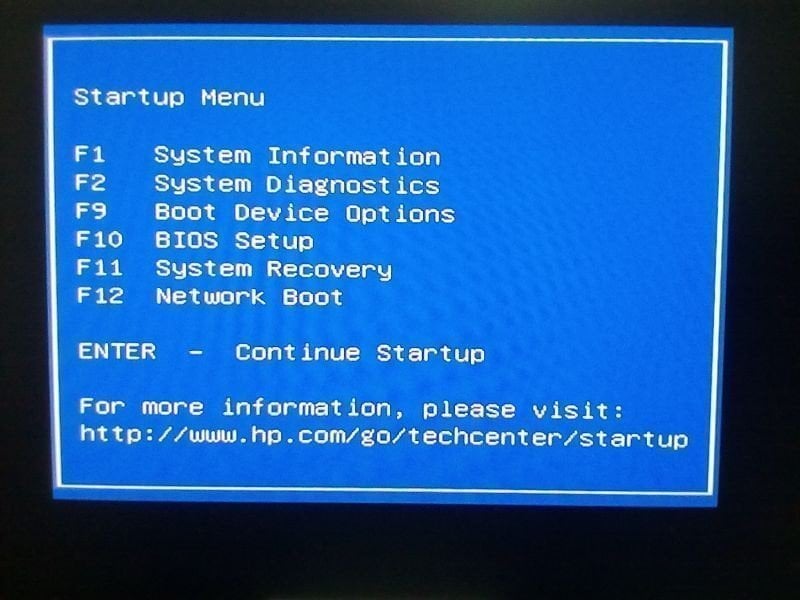
- Turn on your HP computer and immediately press the Esc key to display the Startup Menu.
- Press F11 to access the HP system recovery.
However, some users have reported that the F11 system recovery is not working. This issue can be caused by mistaken deletion or overwriting, or it may occur when upgrading from Windows 7/8/8.1 to Windows 10. When faced with this error, you cannot boot your computer or perform the system recovery. But don’t worry, we have solutions to fix this error.
How to Solve HP F11 System Recovery Not Working Issue in Windows 7/8/10
After understanding the reasons behind the F11 system recovery not working issue, you can try the following three methods to fix it.
Way 1: Try F11 key in the UEFI Firmware Settings
Xem thêm : 5 More Amazing Games Like Pokemon Go
If your computer has UEFI-based firmware, you can try accessing the UEFI Firmware Settings or a similar option in the BIOS. Follow these steps:
- Restart your computer and press the F2 or ESC key prompted to enter BIOS.
- Select Troubleshoot > Advanced Options > UEFI Firmware Settings and click Restart to access it.

- In the Startup Menu window, choose the System Recovery option and press F11, then press Enter to start the recovery process according to the on-screen instructions.
Way 2: Factory reset your computer with HP recovery disc
If you cannot use the F11 key during startup or in the UEFI Firmware Settings, you can use a HP recovery disc to factory reset your computer. Follow these steps:
- Turn on the computer and insert the recovery disc from HP Support. Then, press and hold the Power button to turn it off.
- Disconnect all peripheral devices and remove any recently added internal hardware. Afterward, turn your computer on and repeatedly press the ESC key until you see a Start Menu or Select boot device menu.
- In the Select Boot Device menu, use the arrow keys to set the boot priority for the CD/DVD drive.
- In the Start Menu window, press F9 to open Boot Menu or Boot Device Options. Then, set the CD/DVD drive as the first boot option using the arrow keys.
- Select the Run program from disc option and click Next if you are asked to choose whether to run Recovery Manager from the hard disk or from the disc.
- Follow the on-screen instructions in the Welcome to Recovery Manager window and select the desired options.
- Factory Reset: Reset the computer by erasing the entire drive and restoring it to the factory setup.
- Reset the computer by erasing the entire drive and restoring it to the factory setup.
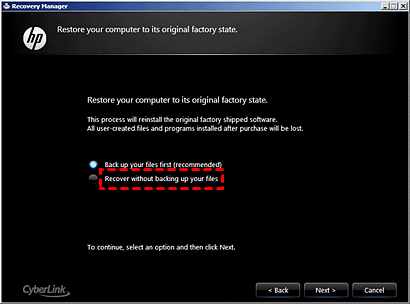
- If required, insert the next disc and repeat the operation several times. Follow the on-screen instructions to complete the system recovery process.
Way 3: Reinstall your Windows OS with Windows Installation disc
If the above methods didn’t work, you can try reinstalling your Windows operating system using a Windows Installation disc. Follow these steps:
- Download the Windows 10 Media Creation Tool and create a bootable USB with it. Boot your computer from the USB.
- Set up the language and other preferences, click Install Now, tick “I don’t have a product key,” select the operating system, and accept the license terms. Remember to click Next after setting each option.
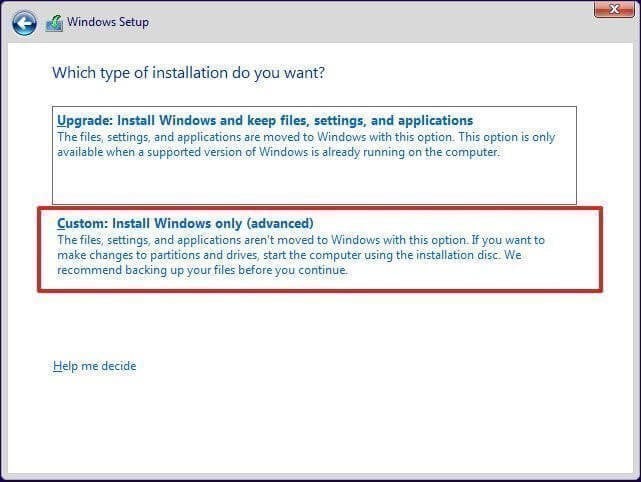
- Select the Custom installation type.

- Select the system-related partition, click Drive Options, and then Delete. After that, select the unallocated space to install Windows and wait patiently.
- Set the username, password, and other preferences.
Safer way to protect the system from failure instead of resetting
Xem thêm : The Password is Incorrect: How to Unlock Your Encrypted Files
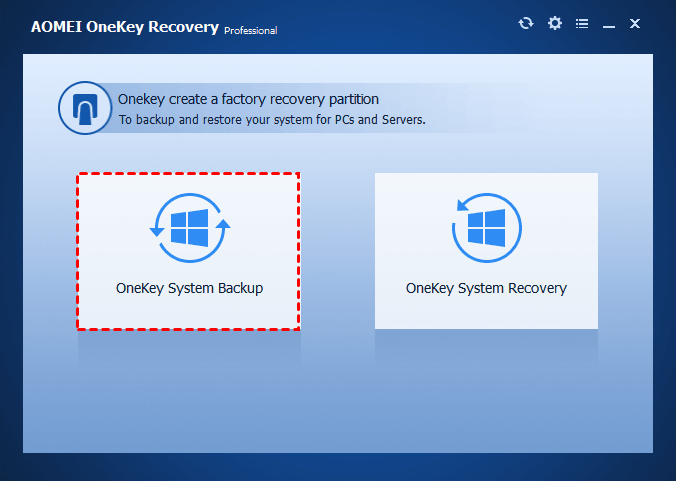
While F11 System Recovery is useful for factory resetting your computer to its default settings, there’s a safer way to recover your computer without losing everything. You can create a system image backup using a reliable one key recovery software like AOMEI OneKey Recovery.
AOMEI OneKey Recovery creates a recovery partition that includes the operating system, personal data, and installed programs. It greatly reduces the risk of mistaken deletion or damage. Here are some helpful features of AOMEI OneKey Recovery:
- Options: You can compress backup images and encrypt them for password protection.
- Scheduler: You can set the backup frequency with daily, weekly, or monthly options.
- Compatibility: It works with all brands of computers, including HP, Dell, Lenovo, Acer, Toshiba, HP, and IBM.
- System support: It supports all editions of Windows operating systems, Windows Server, and other related versions.
- Fast recovery key or boot menu: You can set a quick way, such as the A or F11 key, to access the software. You can also add it to the boot menu directly.
To create a system image backup using AOMEI OneKey Recovery, follow these steps:
- Download and install AOMEI OneKey Recovery on your computer. Then, click on OneKey System Backup in the home console.
- Choose Backup system to AOMEI OneKey Recovery Partition (Recommended) and click Next.
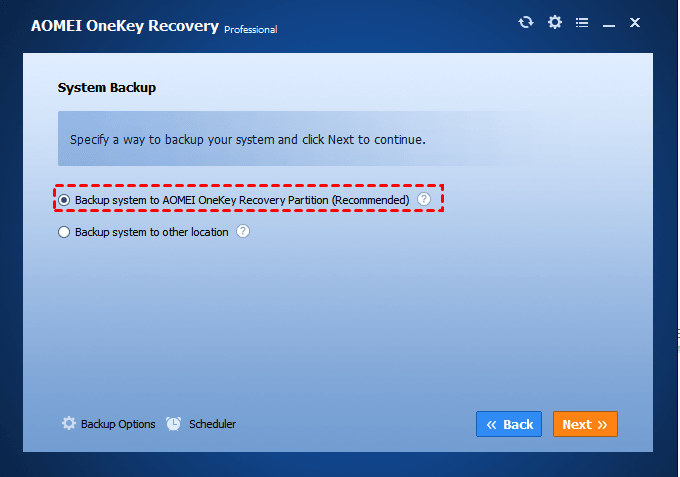
- Tips:
- You can encrypt and compress the backup image with Backup Options.
- You can set daily, weekly, or monthly backup frequencies in the Scheduler.
- Select an existing partition with enough free space to create the AOMEI OneKey Recovery Partition. Click Start Backup.
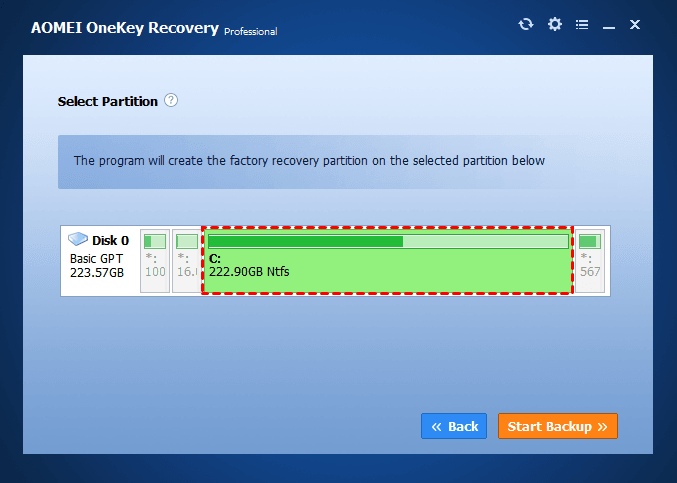
- Note: The backup progress will automatically create an AOMEI OneKey Recovery Partition, where a system backup image (suffix with .adi) is saved. This partition is hidden by default to prevent data damage.
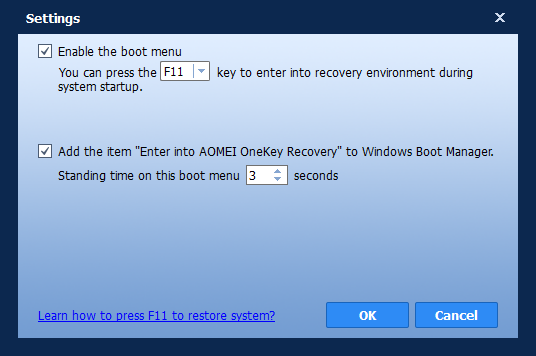
- Wait until the process completes. After that, you can enable the F11 or A key to access the software. You can also add a boot option to the Windows Boot Manager.
Now, you can see the partitions created by AOMEI OneKey Recovery in Disk Management.
Another helpful backup software to protect the system from disaster is AOMEI Backupper Standard. It supports backing up the system to external hard drives or other recognized devices. AOMEI Backupper Standard allows you to create disk backups, partition backups, or file backups based on your needs. It also offers additional backup options, such as intelligent sector backup, VSS backup service, splitting, and daily/weekly/monthly scheduled backups.
In conclusion, you can fix the F11 HP system recovery not working issue or clean install it. However, to avoid losing everything when your computer behaves abnormally, it is recommended to create a system image backup using a reliable backup software like AOMEI OneKey Recovery or AOMEI Backupper Standard. It’s preferable to schedule regular backups as well, so any changes made later can be included.
Nguồn: https://eireview.org
Danh mục: Technology