
Are you struggling with setting up your PIXMA MG3052 printer’s Wi-Fi connection? Don’t worry, we’ve got you covered! In this guide, we’ll walk you through the steps to successfully connect your printer to your wireless network using the WPS pushbutton method. So, let’s get started!
WPS Connection Method
Before we begin, please ensure that your access point meets the following conditions:
Bạn đang xem: PIXMA MG3052 Wi-Fi Setup Guide
- The access point must have a physical WPS push button available. Refer to your device’s user guide for more information.
- Your network must be using the WPA (Wi-Fi Protected Access) or WPA2 security protocol. Most WPS enabled access points will not connect if the WEP (Wired Equivalent Privacy) security method is used or if no security is enabled. You can check the wireless connection settings on your computer for details.
Now, let’s dive into the setup process:
- Make sure your wireless router is within range of the printer and the WPS button is ready to be pressed.
- Press and hold the [Wireless] button (A) on the printer until the Wireless lamp (B) flashes.
- Press the [Colour] button (C).
- Press the [Wireless] button until the Direct lamp (D) lights up.
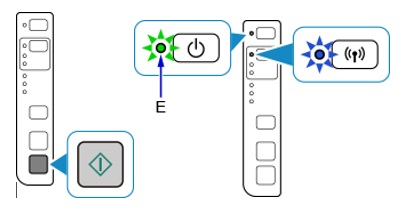
- Press the [Colour] button and ensure that the ON lamp (E) and the Wireless lamp flash. Then, press the [WPS] button on the wireless router within 2 minutes.

- The blue Wi-Fi lamp on the printer will continue to flash while searching, and the Power and Wi-Fi lamps will flash while connecting to the access point. Once the printer successfully connects to your wireless network, the Power and Wi-Fi lamps will stop flashing and remain lit. The network lamp will also light up.
For specific instructions on pressing the WPS button, please refer to the access point manual.
Network Settings Confirmation
Xem thêm : How to Unlock Android Phone Password without Factory Reset
To confirm that your printer is successfully connected to your wireless network, you can print out the network settings:
- Ensure that your printer is turned on.
- Load a sheet of A4 or Letter-sized plain paper.
- Press and hold the [Wi-Fi] button until the Wi-Fi lamp flashes once, then release it.
- Press the [Colour] button.
- Press the [Wi-Fi] button twice.
- Press the [Colour] or [Black] button.
The network information page will be printed. Check that the “Connection” indicates “Active” and that the SSID (Service Set Identifier), which is the name of your wireless network, is correct.
Congratulations! You have successfully completed the WPS setup procedure. Now, it’s time to install the provided software.
If you don’t have the CD(s) that came with your product or if you’re a Mac user, you can download the software from the official Eireview website.
Xem thêm : How to Get Firewall Access on Android Without Root
Note: For Mac users, please ensure you download the appropriate software compatible with your operating system.
Frequently Asked Questions
-
What if the WPS wireless setup still fails?
If you encounter any issues during the setup process, please don’t hesitate to contact our support team for further assistance. We’re here to help! -
Where can I find the user guide for my device?
The user guide for your device should have detailed information on the availability and usage of the WPS push button. Please refer to the manual provided with your device for specific instructions.
Conclusion
Setting up your PIXMA MG3052 printer’s Wi-Fi connection doesn’t have to be a daunting task. By following the steps outlined in this guide, you’ll be able to connect your printer to your wireless network effortlessly. Enjoy the convenience of wireless printing with your PIXMA MG3052!
Remember, for any additional questions or concerns, don’t hesitate to reach out to our support team. Happy printing!
Please visit Eireview for more information on the brand and related articles.
Nguồn: https://eireview.org
Danh mục: Technology